Kubectl: A Comprehensive Cheat Sheet
If you’re a Kubernetes administrator, developer, or DevOps engineer, kubectl is an indispensable tool in the command line. It allows you to manage your application deployments, view logs, access configuration files, etc. To help make your life a little easier, we've compiled a comprehensive Kubectl cheat sheet covering all the essential commands and arguments.
Kubectl Basics
The kubectl command-line tool is the primary way to interact with Kubernetes clusters.
The basic structure of a kubectl command looks like this:
$ kubectl <verb> <resource>The verb tells kubectl what type of action to take (create, delete, etc.), while the resource tells it which object to act on (pods, services, etc.).
Here are some common verbs used with kubectl:
create
Create a resource from a file or stdin.
get
Display one or many resources.
describe
Show detailed information about a resource.
delete
Delete resources by filenames, stdin, resources, and names.
Here are some examples of resources that can be used with kubectl:
pod
A pod contains one or more containers running applications or services for your cluster.
service
Services allow users outside the cluster to connect to applications running inside the cluster.
configmap
Config maps store non-confidential data such as configuration settings as key/value pairs that can then be referenced by other objects in your cluster's manifest files.
secret
Secrets can store confidential data such as API tokens and passwords that need to be securely stored but accessible to pods in the cluster.
ingress
Ingresses provide external access to services within your cluster using HTTP(s) endpoints and custom routing rules based on paths and hosts.
namespace
Namespaces allow you to separate different environments within a single cluster such as development, staging, production, etc., making it easier to organize objects within them without having them interfere with each other's operations.
node
Nodes are physical or virtual machines that run applications in your cluster either directly or through containers managed by orchestration tools like Kubernetes.
Common options for Kubectl
-o, --output: Allows you to specify the output format. The default output format is human-readable plain text, but you can also specify such as YAML or JSON.
-n, --namespace: Selects a namespace for the command to operate in.
--dry-run: Performs a simulation of the requested operations without actually performing them.
--kubeconfig: Allows you to select an alternate kubeconfig file path.
--server: Specifies an alternative server URL if needed.
-l (label-selector): Filters resources based on label values and sets of labels defined by comma-separated key/value pairs from within a resource's specification.
-A,--all-namespaces: Operates on all namespaces instead of one specified via --namespace.
Common Kubectl Commands
If you're looking to effectively manage and interact with the resources in your Kubernetes cluster, these essential kubectl commands are a must-have in your toolkit. Not only are they common and frequently used, but will also streamline your workflow and make working with your cluster a breeze.
View cluster information
This command will display the URLs of the master and all the services with the label kubernetes.io/cluster-service=true.
It is useful for troubleshooting and verifying that the kubectl command-line tool is properly configured and connected to a cluster.
$ kubectl cluster-infoDump current cluster state
This command will display the current cluster state to the standard output.
$ kubectl cluster-info dumpTo save the cluster state to a file in the current directory, use the --output-directory option. This will save the cluster state to a file called nodes.json.
$ kubectl cluster-info dump --output-directory='.'List all the nodes
This command will show a concise view of the nodes in the cluster.
$ kubectl get nodesTo get a full view use the -o wide option.
$ kubectl get nodes -o wide
List namespaces
This command will list all namespaces in the cluster. Namespaces are used to divide cluster resources between multiple users or projects. Each namespace has its own set of resources and can have its own set of permissions and access controls.
The output will show the name of the namespace, the status, and the age of the namespace.
$ kubectl get namespaces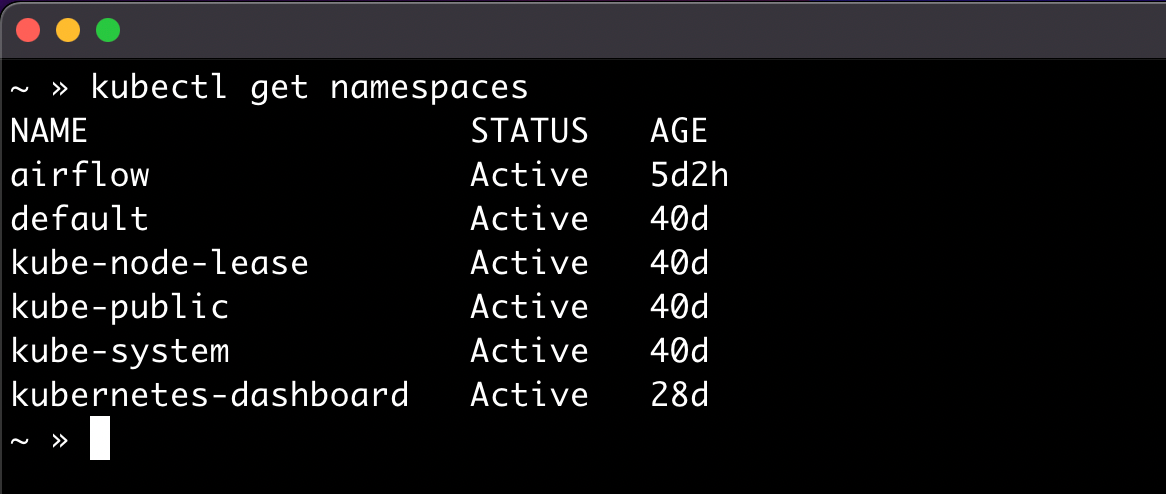
You can also use the keyword ns instead of the term namespaces.
$ kubectl get nsList information about pods in the cluster
This command will list the pods in the cluster. If no namespace is specified, the pods in the default namespace are displayed.
$ kubectl get pods
No resources found in default namespace.
To show the pods in a particular namespace, use the --namespace or -n option.
To list the pods in the kube-system namespace:
$ kubectl get pods --namespace kube-systemTo list pods in all namespaces use the -A or --all-namespaces option.
$ kubectl get pods -A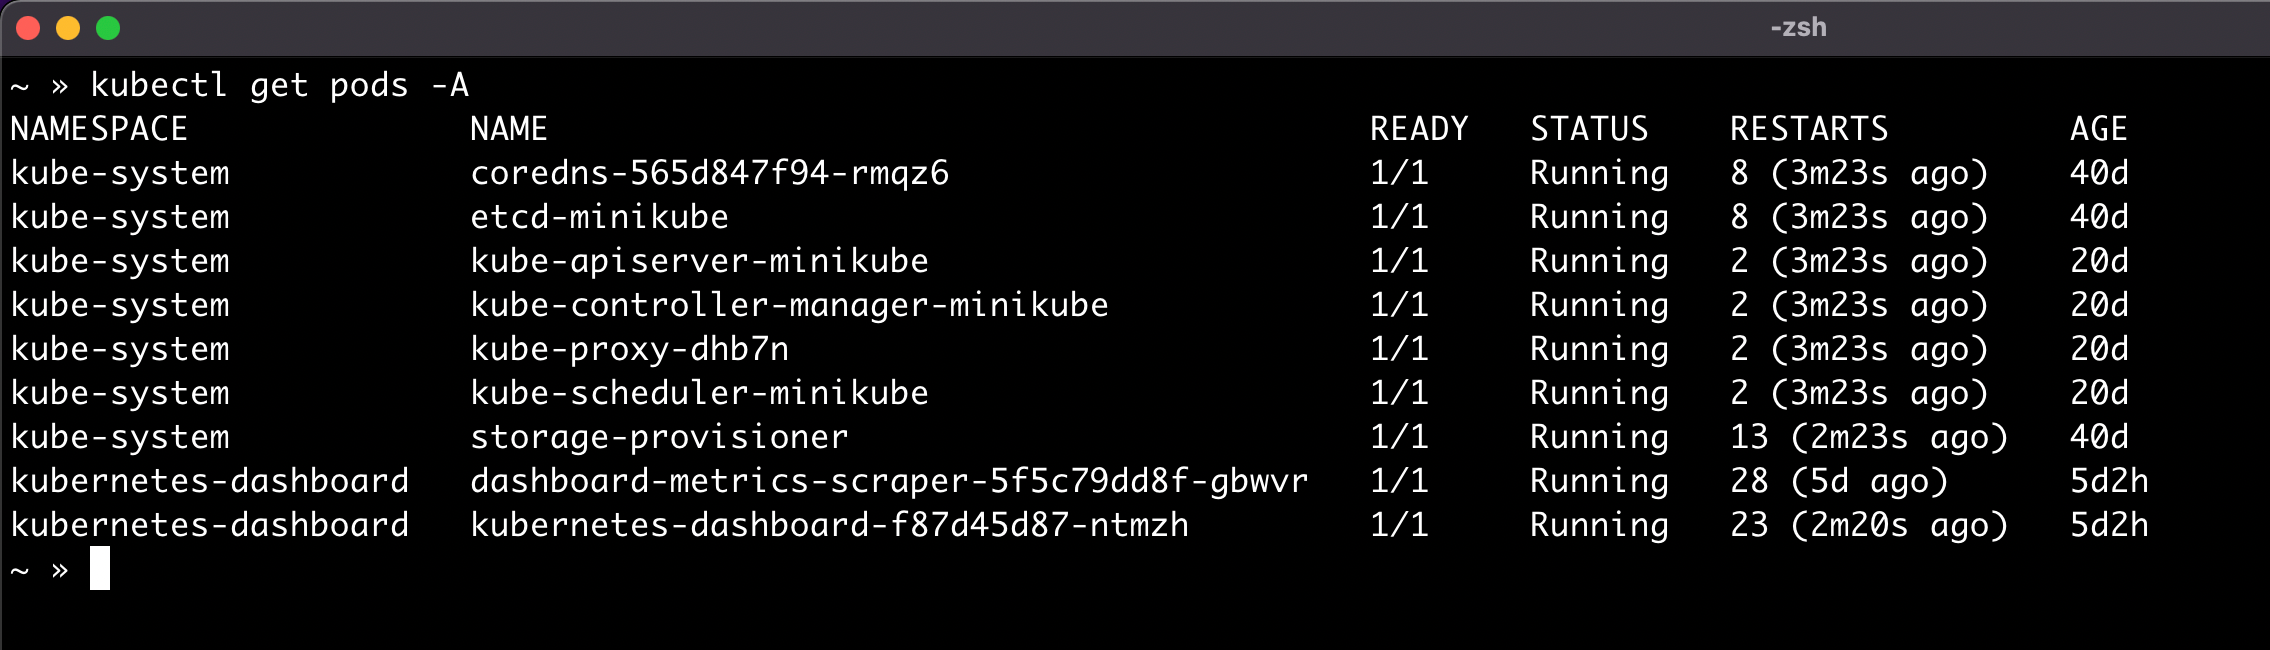
Describe a pod
This command displays detailed information about a specified pod in your Kubernetes cluster. The output includes the pod's name, namespace, and all of the pod's containers, as well as the pod's status, resource limits, and other metadata.
kubectl describe pod <pod-name>kubectl --namespace kube-system describe pod <pod-name> 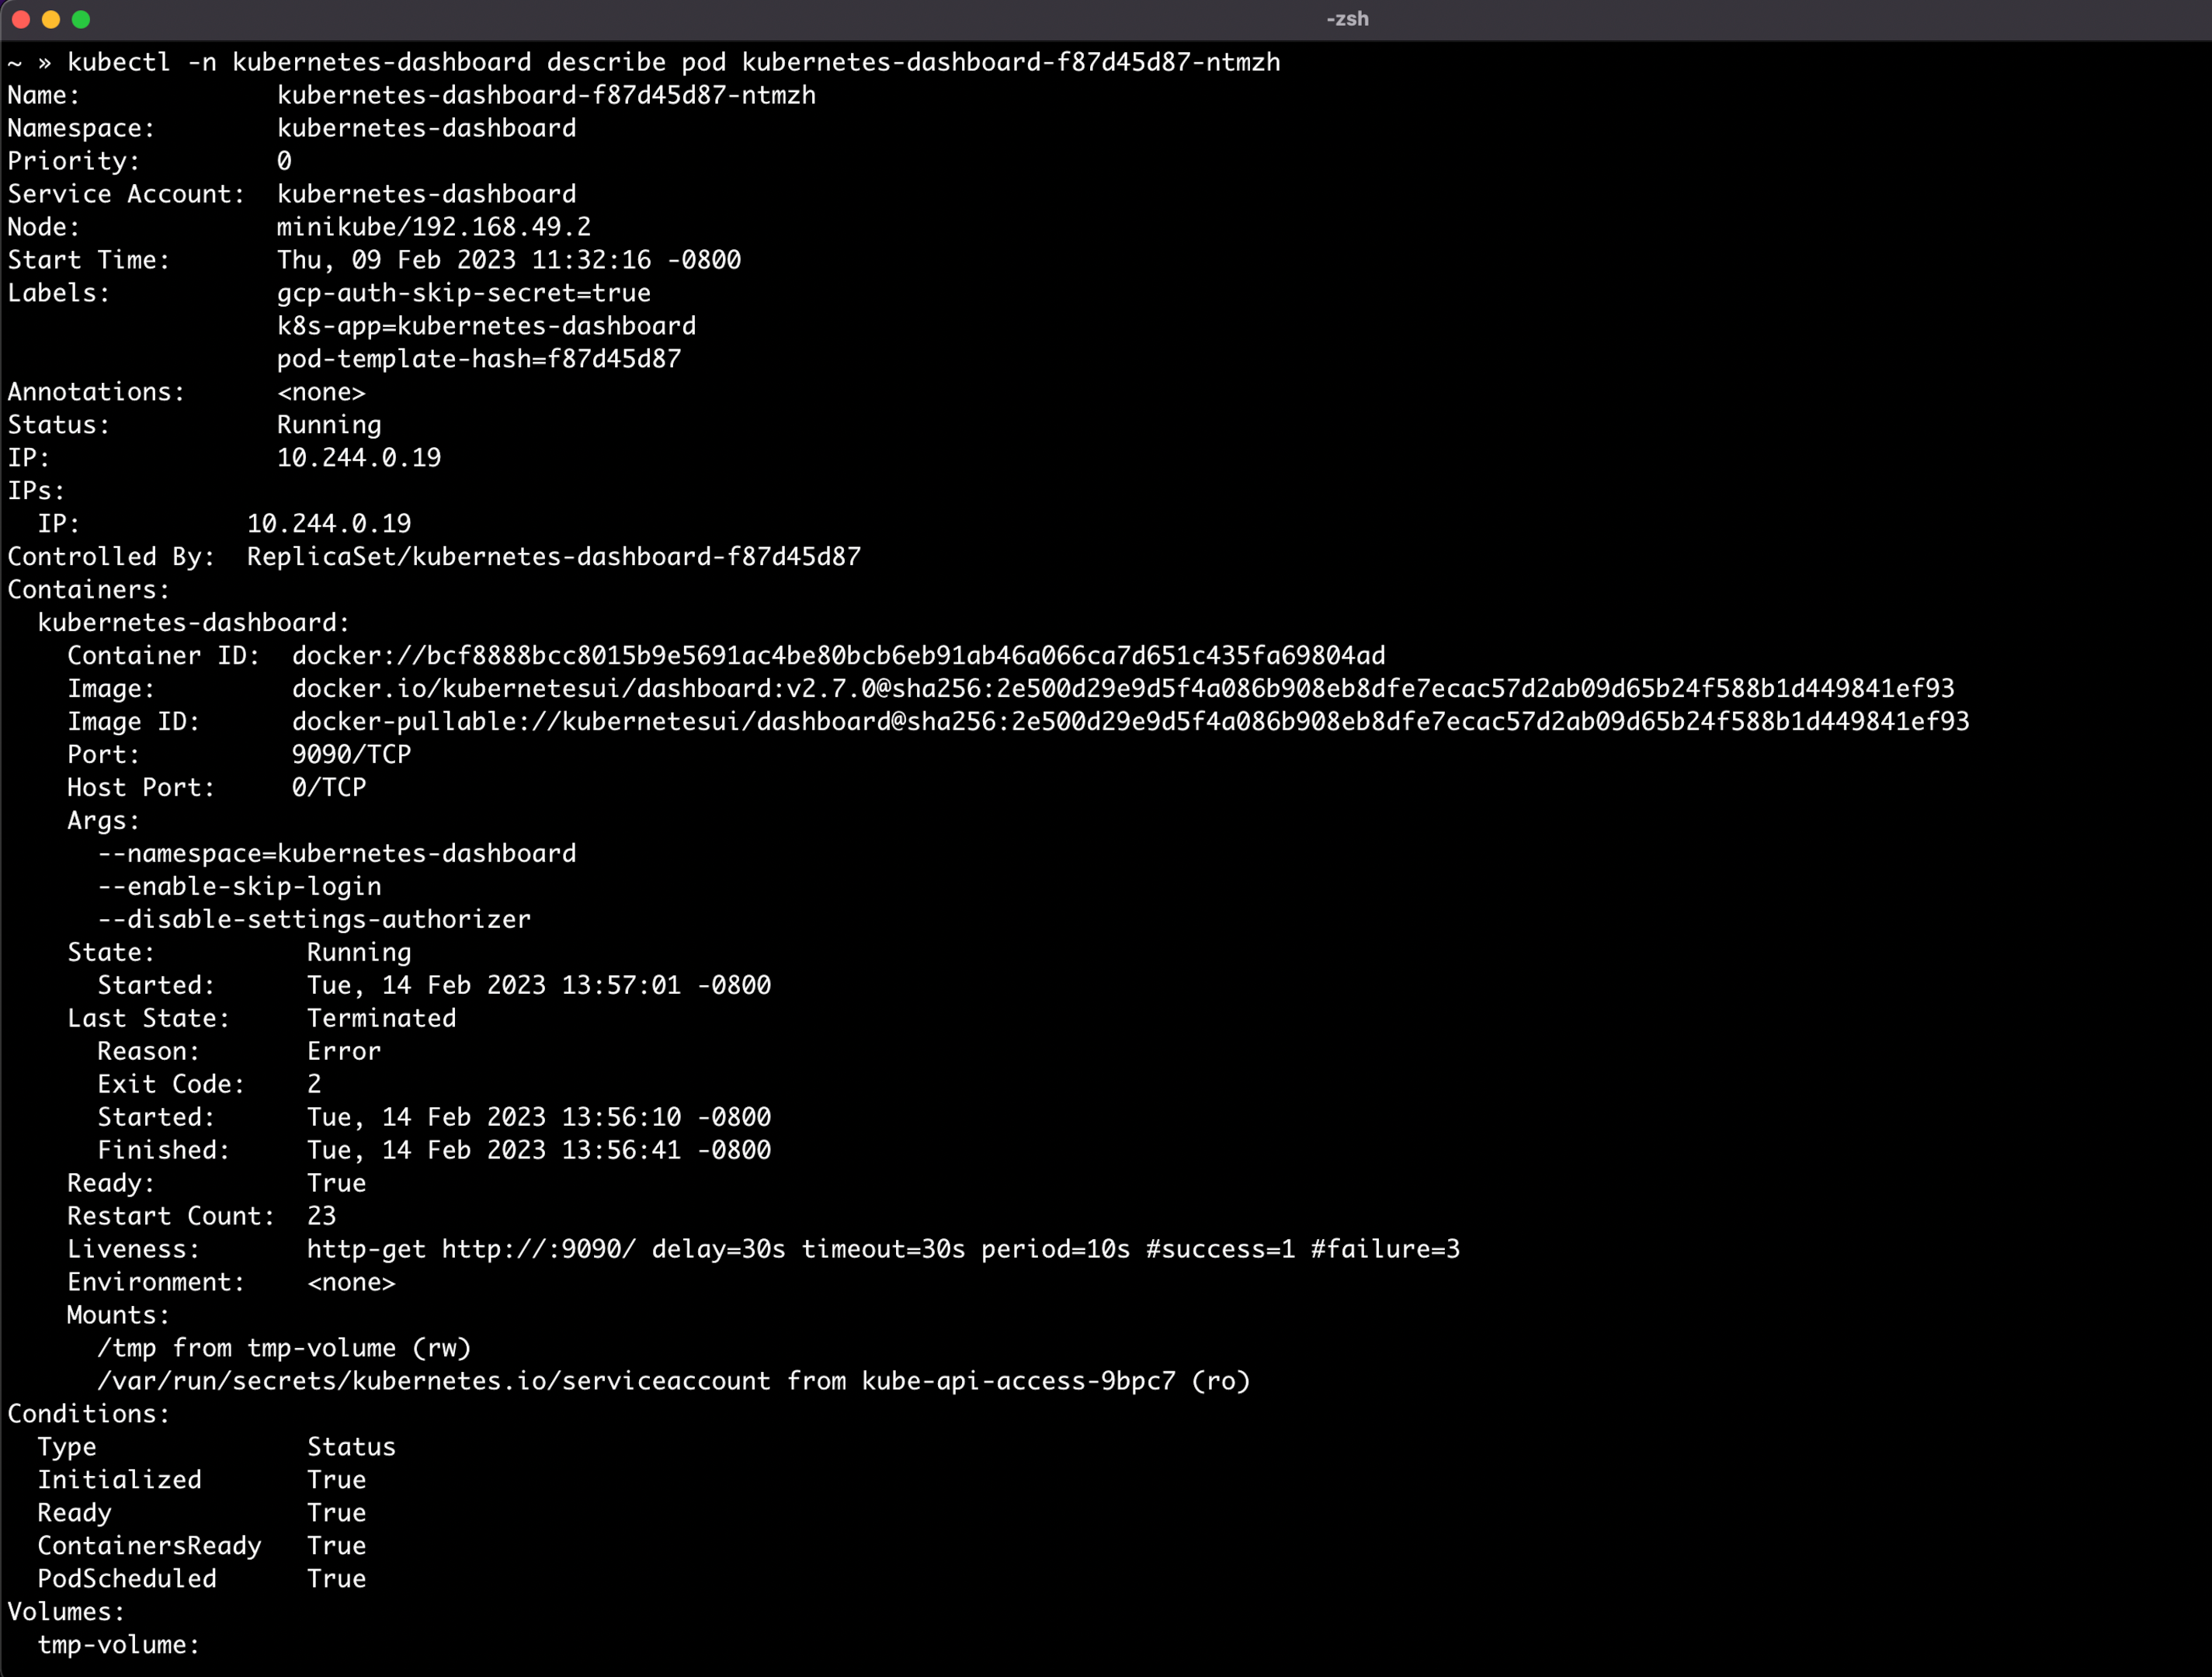
Create resources based on configuration file
kubectl create -f is a command that creates one or more resources from a file or stdin. The -f flag stands for "filename" and specifies the file that contains the resource configuration.
Here is an example of how to create a pod using kubectl create -f:
$ kubectl create -f ubuntu-multicontainer.yamlThe ubuntu-multicontainer.yaml file should contain the configuration for the pod, in YAML format. In this example, a pod called ubuntu-example is created with two containers ubuntu-container1 and ubuntu-container2.
apiVersion: v1
kind: Pod
metadata:
  name: ubuntu-multicontainer
spec:
  restartPolicy: Never
  volumes:
  - name: shared-data
    emptyDir: {}
  containers:
  - name: ubuntu-container1
    image: ubuntu
    command: ["/bin/bash"]
    args: ["-c", "while true; do echo `date`: ubuntu-container1; sleep 5; done"]
  - name: ubuntu-container2
    image: ubuntu
    command: ["/bin/bash"]
    args: ["-c", "while true; do echo `date`: ubuntu-container2; sleep 5; done"]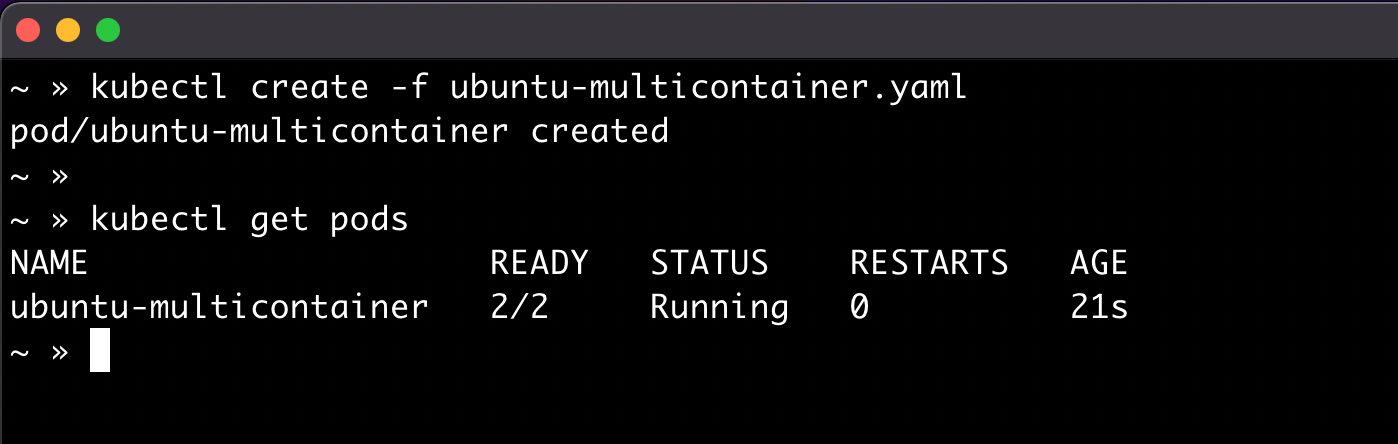
You can also use kubectl create -f to create multiple resources at once by specifying a directory instead of a single file. For example:
$ kubectl create -f /path/to/resources/This will create all the resources in the specified directory.
Check logs for a pod
The kubectl logs command displays the logs of a running container in a pod in your cluster. The logs can be useful for debugging and troubleshooting problems with your application.
$ kubectl logs <pod-name>Here are some examples of the kubectl logs command and its output:
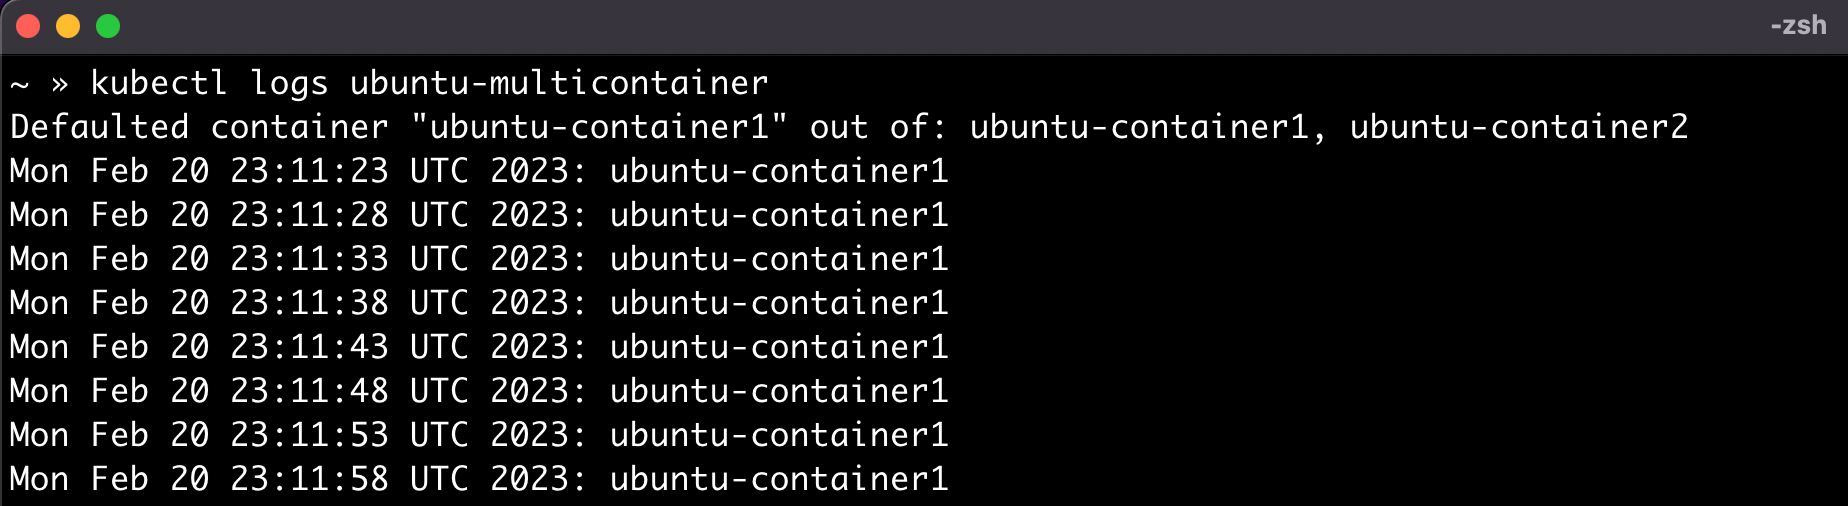
When there are multiple containers in a single pod, the kubectl command default to the first container. In this case, the logs of the first container ubuntu-container1 in the ubuntu-multicontainer pod are displayed by default.
To view the logs of the second container ubuntu-container2 in the ubuntu-multicontainer pod, append the -c <container-name> option.
$ kubectl logs <pod-name> -c <containter-name>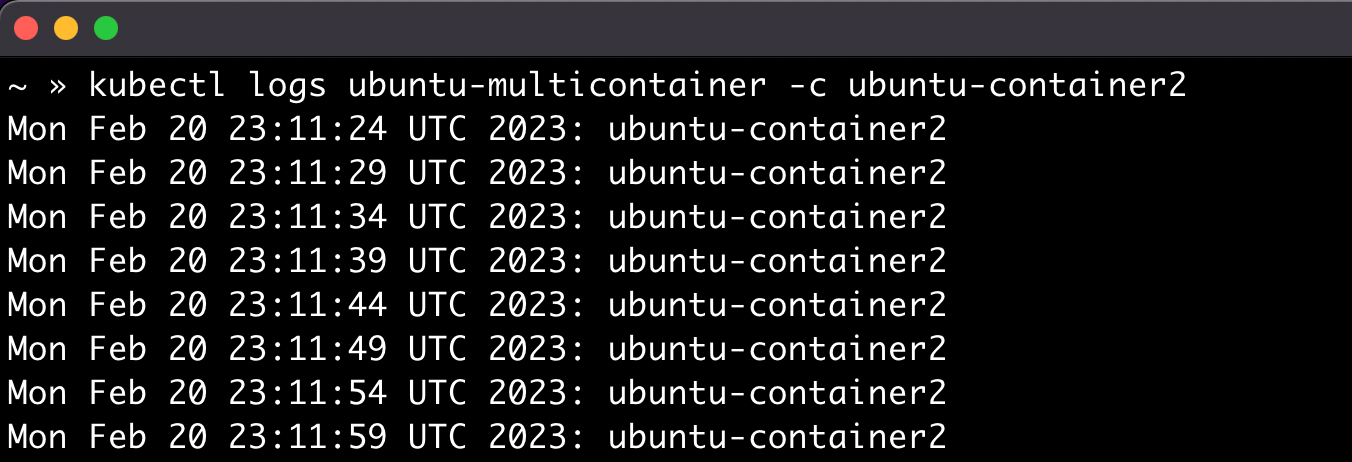
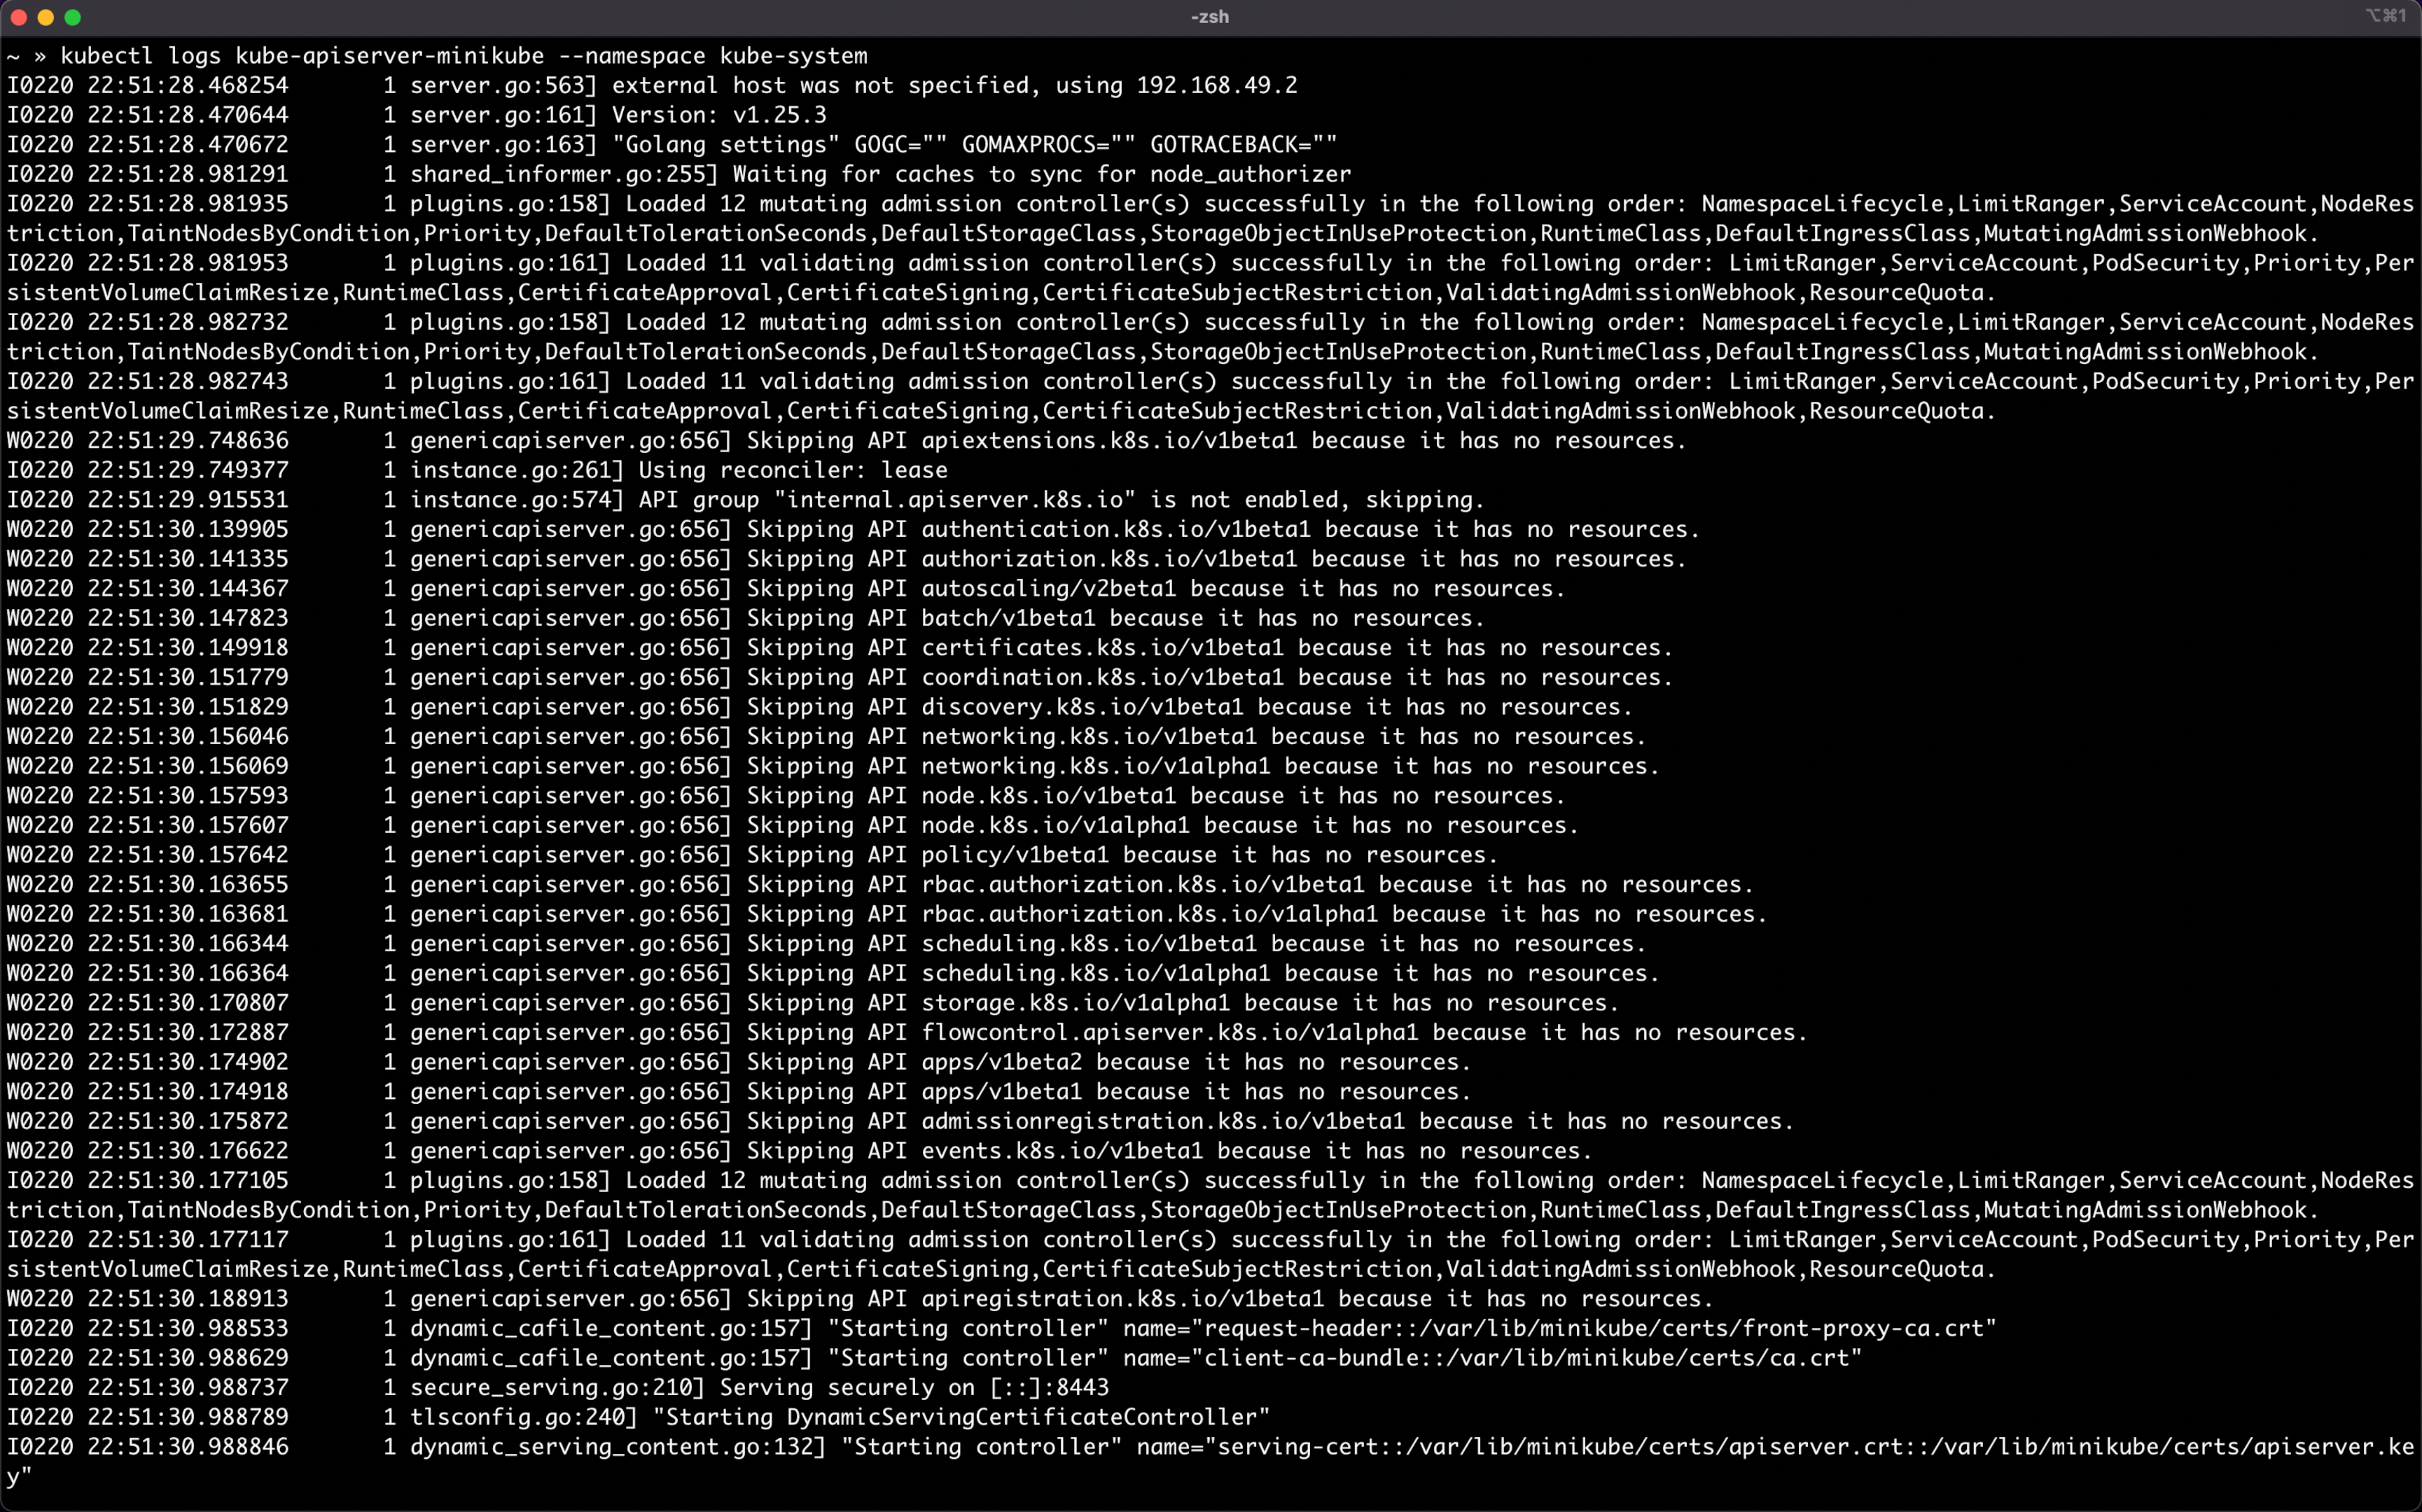
Here's another example to view the logs for the kube-apiserver-minikube pod in the kube-system namespace.
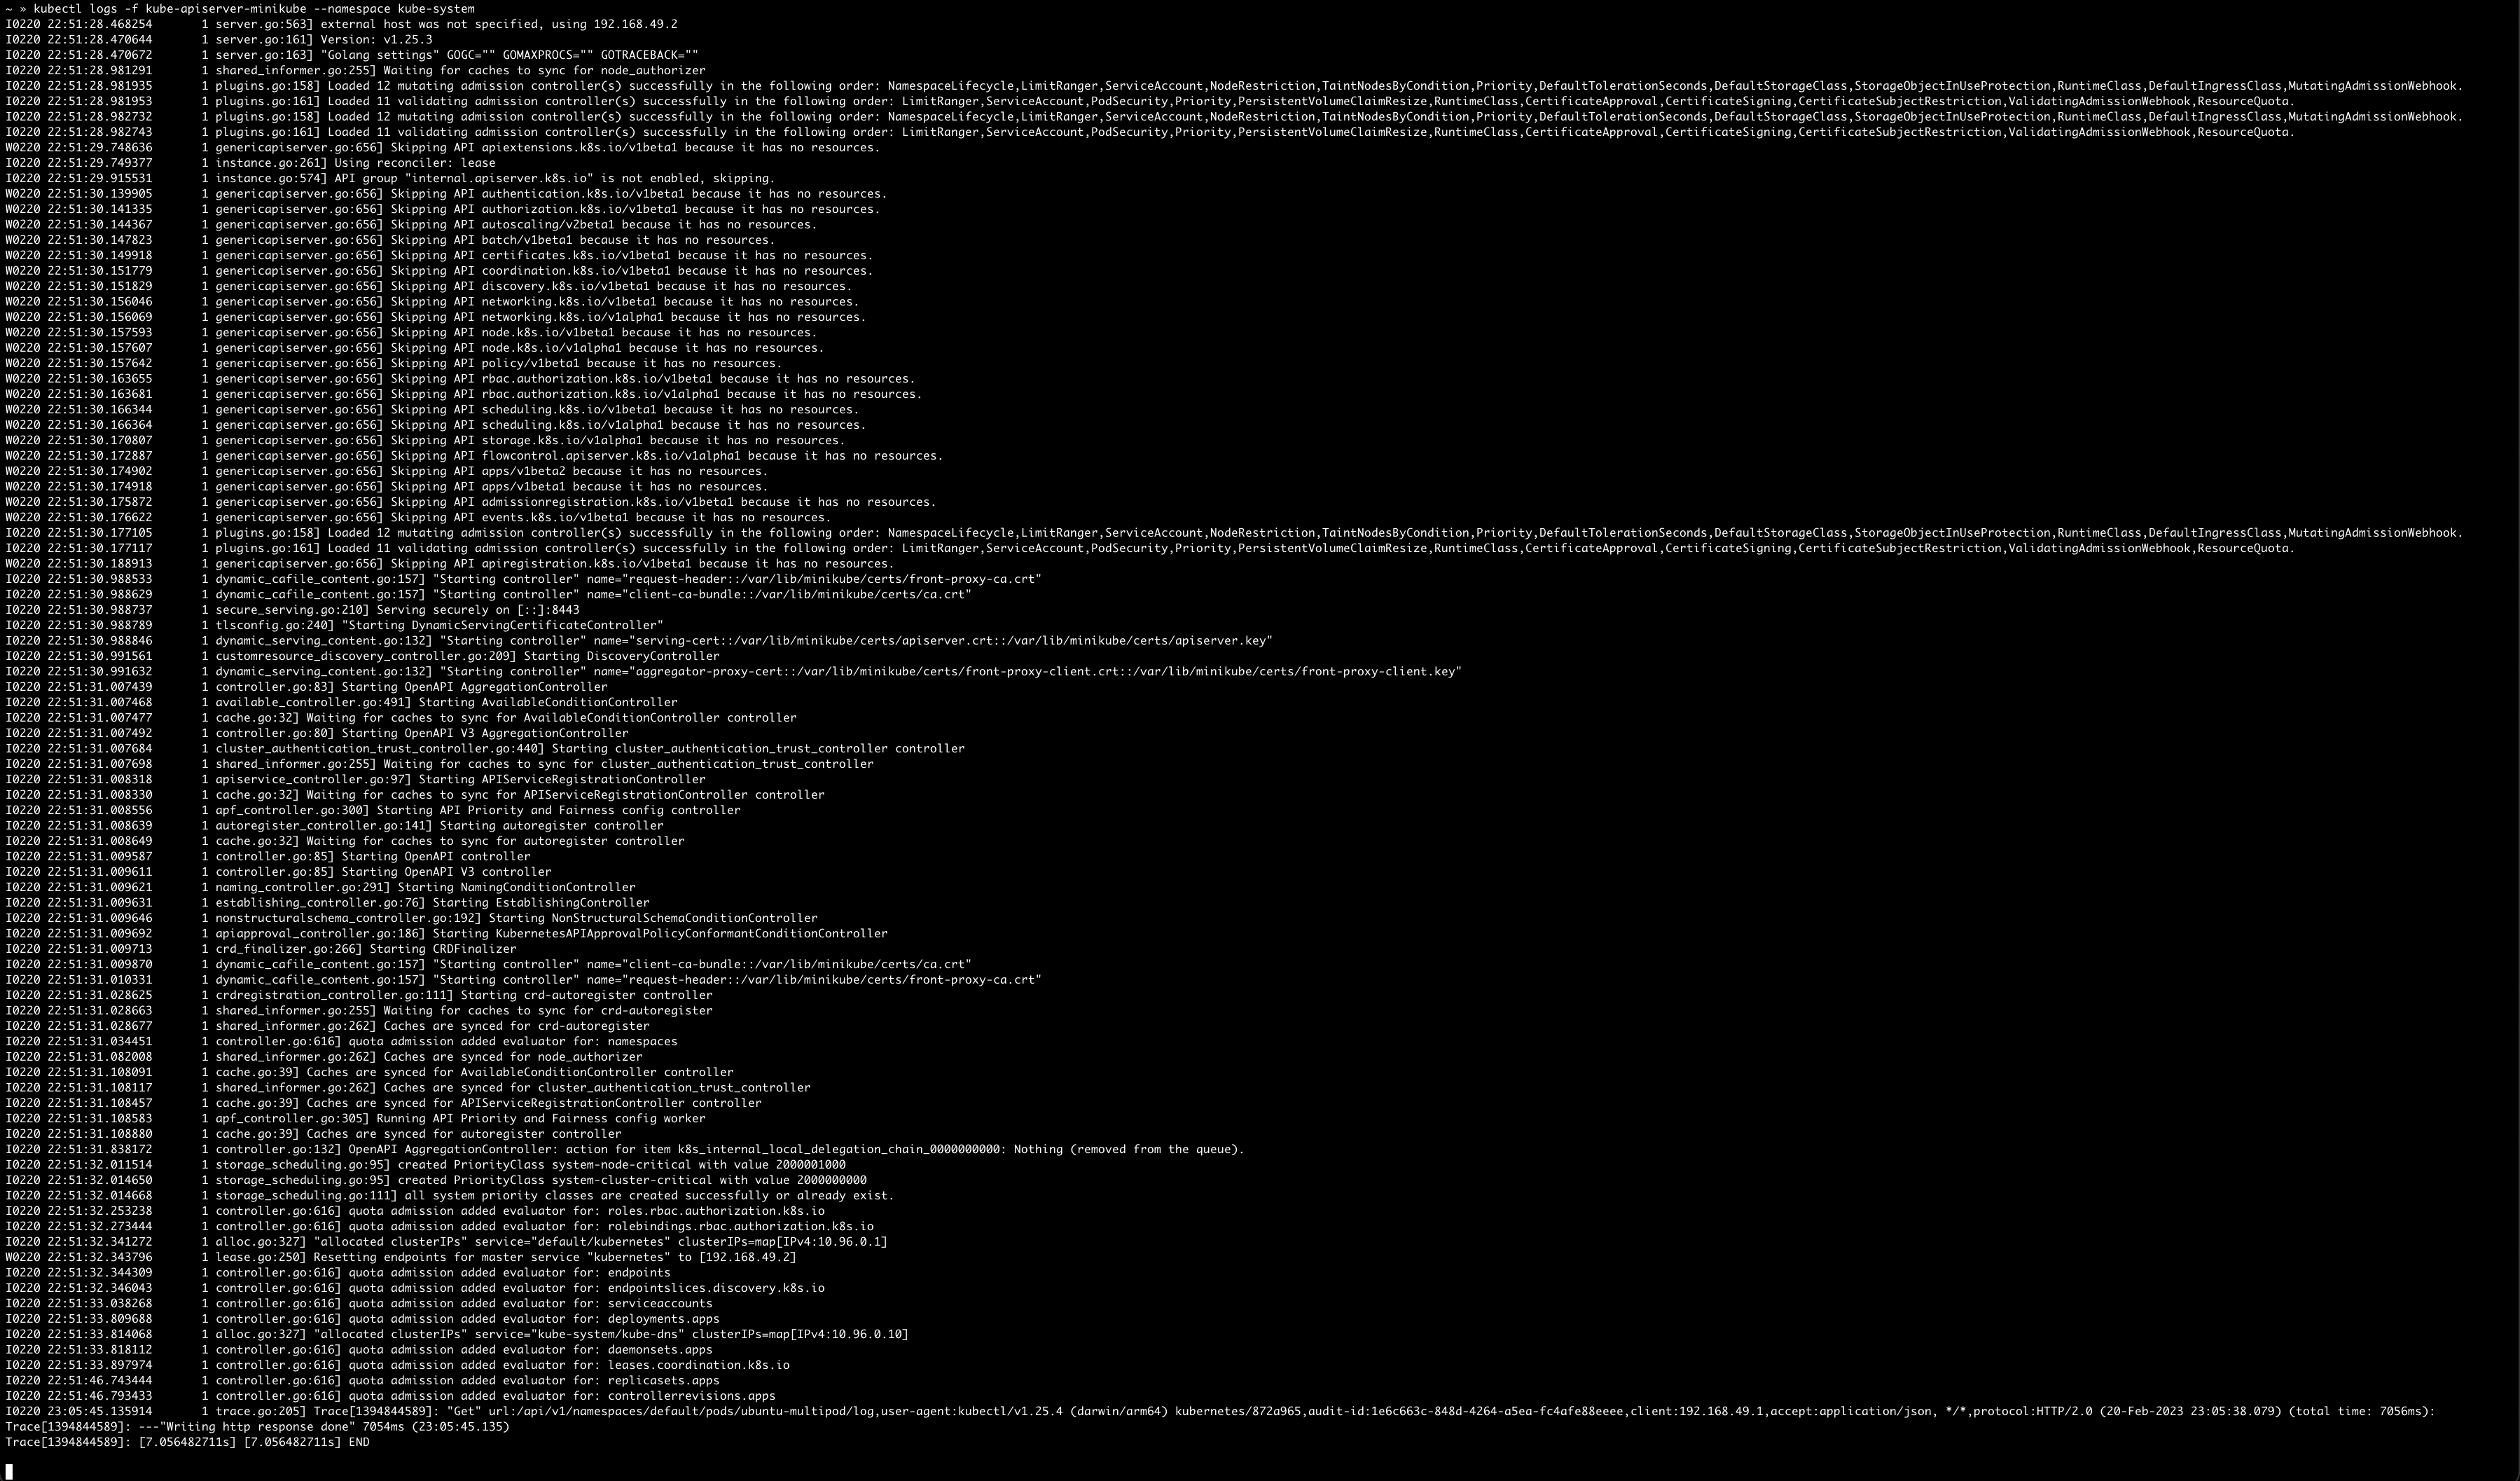
You can also use the -f flag to follow the logs in real-time, similar to the tail -f Linux command:
For detailed information about the kubectl logs command, you can run kubectl logs --help.
List containers per pod
This command will show the list of containers in each pod in the default namespace.
$ kubectl get pods -o jsonpath='{range .items[*]}{"\n"}{.metadata.name}{":"}{range .spec.containers[*]}{.name}{", "}{end}{end}' | sort
Use this command to list the names of containers running in each pod across all namespaces.
$ kubectl get pods --all-namespaces -o jsonpath='{range .items[*]}{"\n"}{.metadata.name}{":"}{range .spec.containers[*]}{.name}{", "}{end}{end}' | sort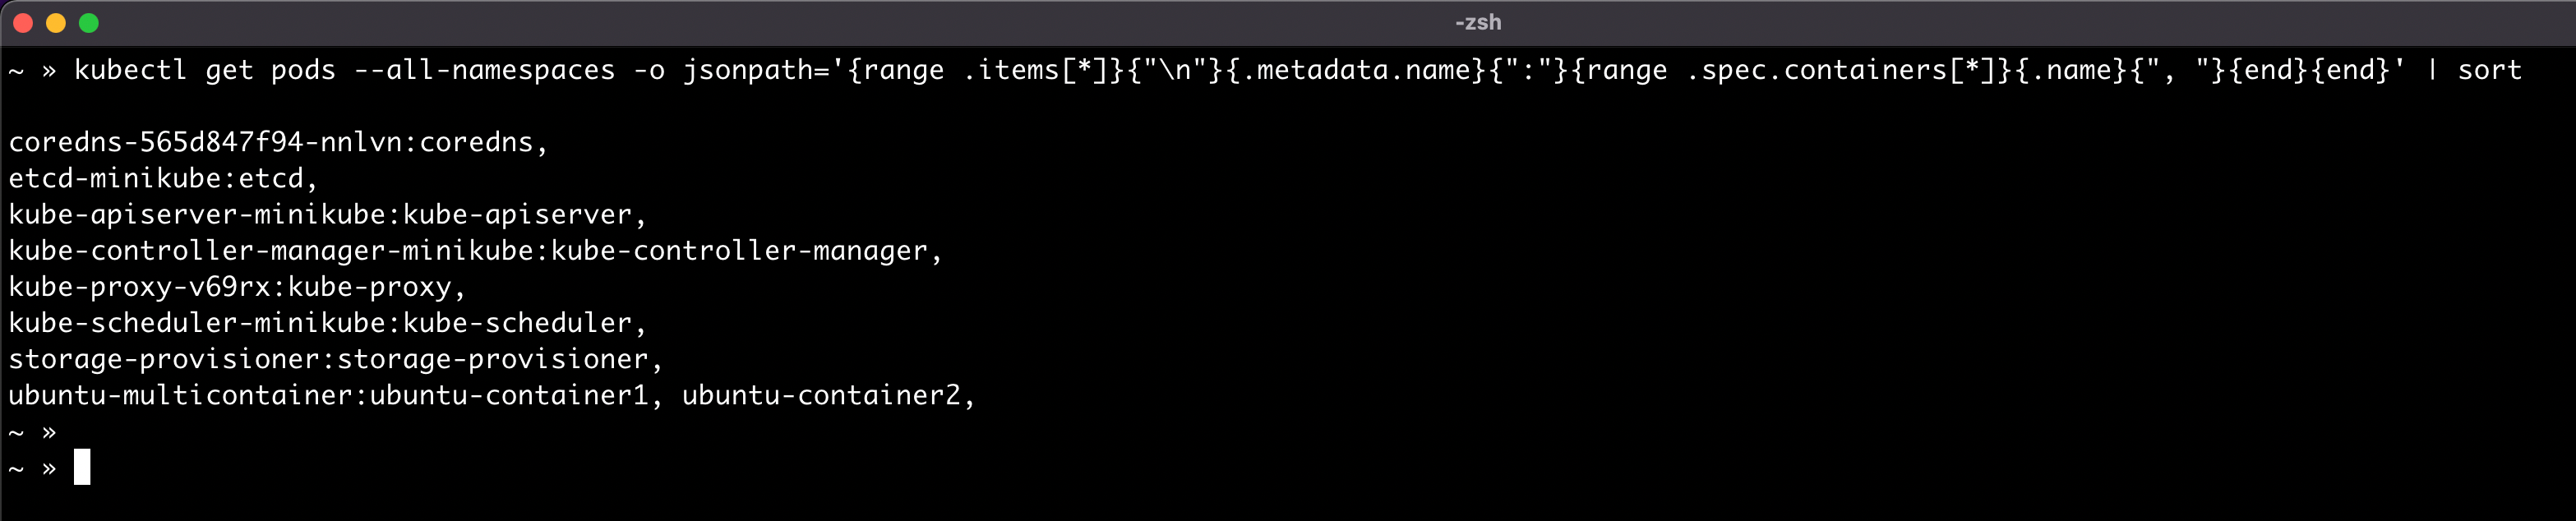
List deployments
This command will show the list of deployments in the cluster.
$ kubectl get deployments --all-namespaces
List services
This command will show the list of services in the cluster.
$ kubectl get services --all-namespaces
Run a shell inside a running container
To run a shell inside a running container in a pod, you can use the kubectl exec command. This command allows you to execute a command inside a container in a pod.
$ kubectl exec -it <pod-name> -- /bin/bashHere is an example of how to run a shell inside a container using kubectl exec:
$ kubectl exec -it ubuntu-multicontainer -- /bin/bash

Defaulted container "ubuntu-container1" out of: ubuntu-container1, ubuntu-container2
root@ubuntu-example:/#
This command will open a shell inside the container of the my-pod pod. The -i flag stands for "interactive" and the -t flag stands for "tty", which allows you to interact with the shell.
You can also specify the container name if the pod has multiple containers:
$ kubectl exec -it ubuntu-multicontainer -c ubuntu-container2 -- /bin/bash

root@ubuntu-example:/#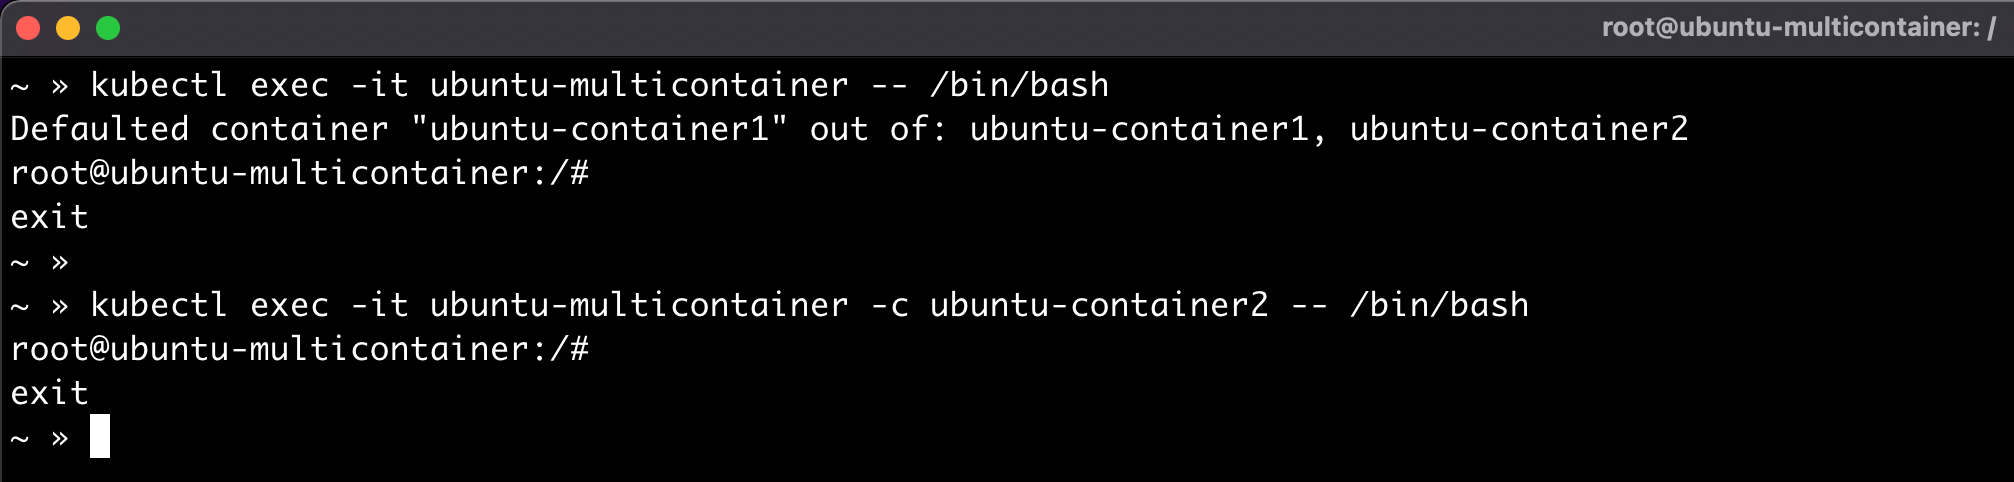
Delete pod
To delete a deployment using kubectl, you can use the following command:
kubectl delete pod <pod-name>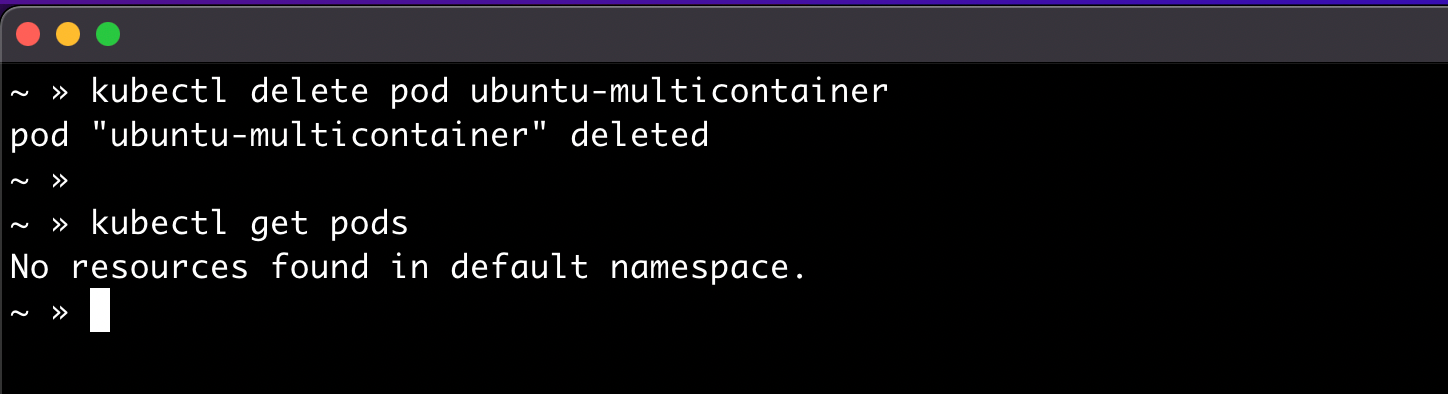
Conclusion
Managing Kubernetes clusters can be complicated, but knowing how to use Kubectl is an essential skill.
With this guide in hand, you’ll be able to quickly understand how each command works and start using all of the powerful features of Kubernetes right away!
Comments ()